Blender Add-on
🇺🇸 English | 🇰🇷 한국어
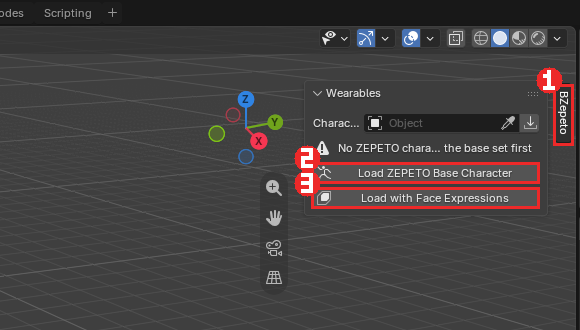
The red boxes in the pictures are what you click, in the order of their numbers.
1. Install
- In Blender: Edit > Preferences > Add-ons, click ▼ at the top right, Install from Disk
- Pick
bzepeto_blender-<version>.zip— the zip itself, do not unzip it - Type
BZepetoin the search box and make sure the add-on is ticked ① - Open it with the small arrow and set ArmorPaint Executable ② to
ArmorPaint.exein the folder where you unzipped ArmorPaint (see ArmorPaint)
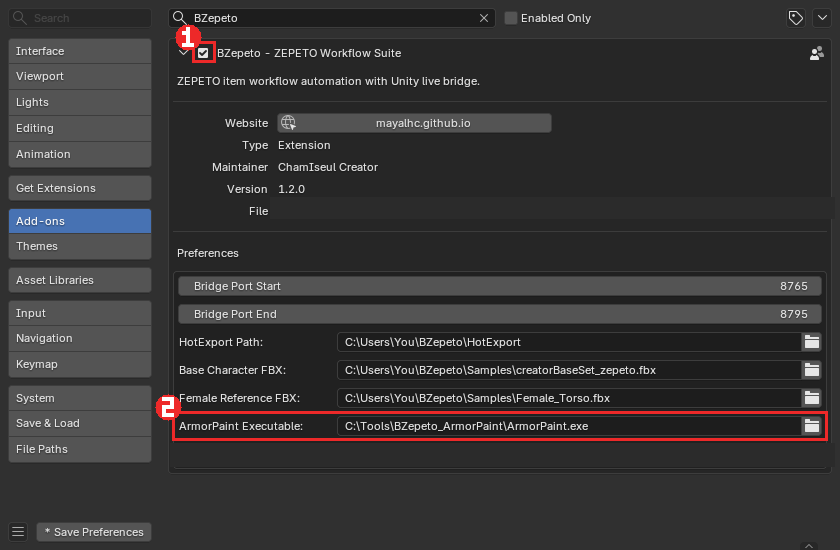
Base Character FBX points at ZEPETO's creatorBaseSet_zepeto.fbx (default
%USERPROFILE%\BZepeto\Samples\). BZepeto does not include it — download it from ZEPETO's creator
resources.
2. The BZepeto tab and the base character
- In the 3D viewport press N, then click the BZepeto tab ① on the right edge
- In Wearables, press Load ZEPETO Base Character ②
- For headwear and masks, use Load with Face Expressions ③ instead: the base also gets ZEPETO's 249 face expressions
Folding the panels — the parts of the BZepeto panels (Pose, High Heel, Weights, Body Shape, the Send rules ...) collapse with the ▸/▾ arrow in their header. The folded row keeps the status that matters (the current pose, the heel angle, the swing chain count, the weight problem count ...), so you can fold what you are not using and keep the panel short. Blender remembers what you folded.
3. Rigging
- Bone counter — compares your rig with ZEPETO's 104-bone base skeleton and counts the swing bones you added
- Pose — switch between T-pose and A-pose. Going back restores the saved rig instead of rotating again, so the shoulders do not drift after repeated switches
- Weights — transfer, mirror, limit to 4 influences
- Bone Cleaner — remove unused bones
High heels
The High Heel box under Pose lifts the heels. The toes stay flat and in place on the floor and the body rises with them.
- Heel Angle lifts the heels (degrees); Sole (cm) adds a platform under the toes
- Model the shoe on the raised feet
- Select it: Make Garment (Shoes), then Bind Garment To Character. The shoe stays where you modelled it; inside, it is bound to the flat foot ZEPETO skins it on
-
Export / Send: only a Shoes item carries ZEPETO's heel data (the
expressionsbones). ZEPETO poses the avatar's feet, toes and hips from it, so the shoe is worn as it looks in Blender. Tops, dresses and other items never carry it -
Flat Feet turns the heel off
- Read Heel From Rig takes the heel of an imported ZEPETO heel item onto the sliders
- The heel is only a pose, never baked into the rest pose; body sliders and T/A switches keep it
Gloves, nails and rings (Glove Test)
- Make Garment for hand items (gloves, nails, rings, bracelets) weights every vertex from its own finger's skin only -- no bones of the next finger in the gap between two fingers
- Nails go on their finger's tip bone, one bone per piece at 100%; rings on one bone per piece
- Glove Test > Fist curls both hands into a fist as you raise it: watch gloves, rings and nails follow the fingers. Only a pose -- the export always uses open hands
Skirts, dresses and coats
Made as Skirt, Dress or Outerwear, a garment's leg weights change sides gradually around the body (half and half at the front and back middle, one leg at the sides), so a stride no longer splits it open in the middle like trousers
Swing bones (hair, skirts, ribbons)
- In Edit Mode, select the edge runs the chains should follow (four vertical runs on a skirt = four chains)
- The panel tells you what it will build first: "4 chain(s), 12 bone(s)"
- Choose bones per chain, a preset (hair, ribbon, skirt, coat, accessory), the bone to hang from and the weight radius
- Make Swing Chains
Bones are named the way ZEPETO reads them: <joint> physics <drag> <angle drag> <restore drag>.
ZEPETO recommends 2–5 chains per item. Remove Physics Naming strips the physics part again.
4. Body shape
Eight sliders — height, shoulder width, chest, waist, pelvis, leg length, neck, head size — with Realtime to see the character change while you drag. Leg length moves the bones the way the ZEPETO SDK does, so the feet stay on the ground.
5. Wearables
Import Clothing (FBX) (the Top / Bottom / Full / Head Accessory buttons) → Align Mesh to Base Body
→ Make Garment Rig → Bind Garment To Character → Refit Clothing To Body. Auto Mask from Items
paints the body black where the items cover it (ZEPETO hides those parts).
Touching up the mask by face — ZEPETO hides every vertex that is not white and removes every triangle touching one, so painting finer (a subdivided copy) changes nothing. Work on the result instead, face by face:
- Show Removed Triangles — draws on the body, in red, every triangle ZEPETO removes (follows the pose and the body shape). Auto Mask turns it on.
- Select the body (
mask), Tab into Edit Mode, select faces: Mask Faces removes them, Unmask Faces brings them back. Mask Faces never removes a face outside the selection (so a face at its edge may stay); to remove all of it, turn on Cover Whole Selection in the redo panel (the ring just outside goes too). - Select Removed Faces selects what is removed now — handy for touching up an Auto Mask.
6. Send to ZEPETO
- Select the item and choose its Category ① (e.g. Skirt) — the limits of that category show under it
- Press Check ②. The result list shows every rule: ✔ passed, ⚠ warning, ✖ must be fixed — by default only the problems are listed; Show all below it expands the full list
- A failed rule comes with the button that fixes it ④ (e.g. Fix Transforms, Create ZEPETO Material, Shrink Textures to 1 MB)
- When nothing is red, press Send to Unity ③
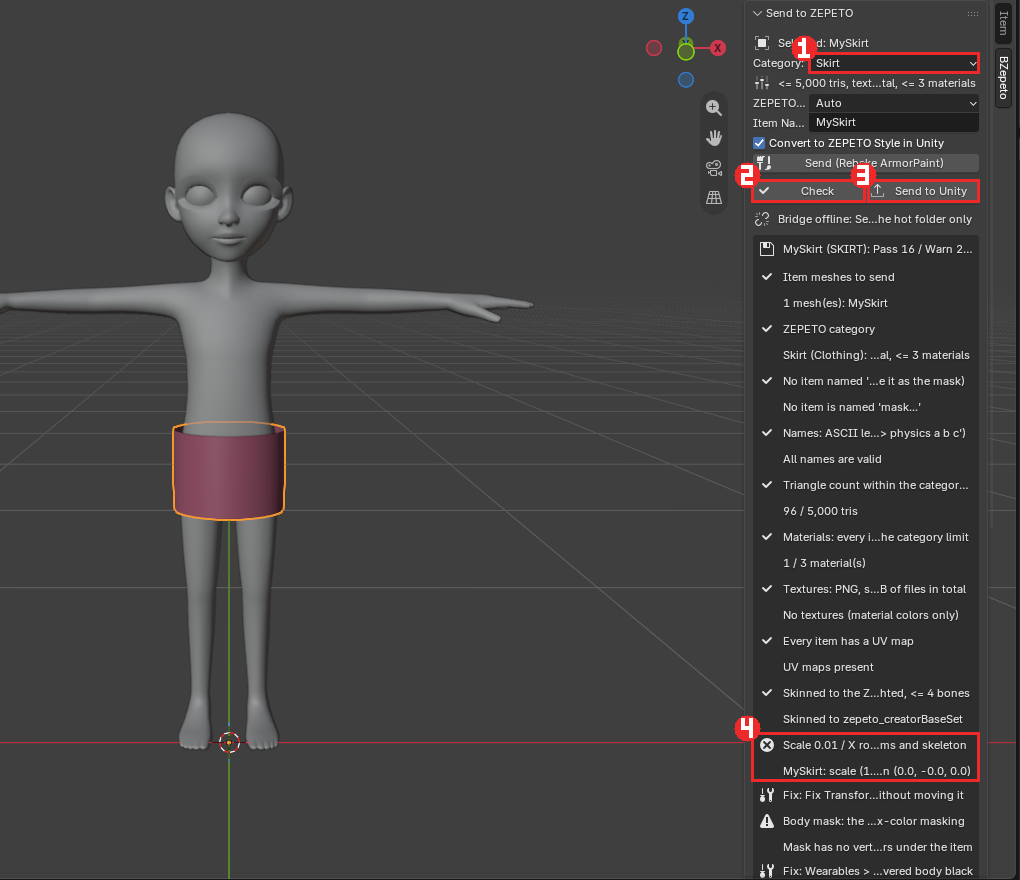
The check covers 20 rules: triangles, materials, material names, texture size (512 px) and 1 MB of texture files in total, UVs, bone influences, transforms, names, mask, hair, item size, face expressions and more.
Material names (ZEPETO's rule) — ZEPETO's guide names a material item name + _shd
(e.g. TOP_turtleneck_shd), and the mesh starts with its type: dress DR, top TOP, bottom and skirt
BTM, headwear HEADWEAR. A custom body part keeps skin.
- A default name (
Material.001,lambert2) or a name without_shdgets a warning with the name to take instead (e.g.Material -> TOP_shirt_1_shd) - Fix Material Names renames them in one go: a default name follows the mesh name, numbered when there are several. Rename the mesh yourself
- Materials BZepeto creates are
<mesh name>_shdtoo
ZEPETO Shader — pick the item's shader in the Send panel (Auto lets Unity guess from the names). It travels with the item to Unity and sets ArmorPaint's ZEPETO Mode.
| Shader | For |
|---|---|
| Lit | standard items |
| Cloth | velvet-like sheen |
| Fur | shell fur |
| HairAlpha | hair with see-through strands |
| Sparkle | glitter |
| Iridescence | pearl, holographic |
| Prism | clear coat, enamel |
| CustomEnv | gems, high gloss — reflects its own HDRI |
| Toon | cel shading |
| Detail Normal | tiled fine detail |
Hair (HairAlpha) — the hair check warns when strands do not run along UV V, when the base colour has no alpha, or when the card layers are out of order. Sort Hair Layers puts the inner cards first.
CustomEnv — set Env HDRI (.hdr, a small 2:1 panorama such as 256×128 or 512×256; it counts
toward the 1 MB). It becomes the reflection cubemap in Unity.
1 MB of textures — when the total is over, the hint names the maps to shrink ("base 1024 -> 512 px (about 700 KB)") and Shrink Textures to 1 MB makes resized copies next to the originals and uses them in the item's materials. The originals stay.
7. Review Tools (under Send)
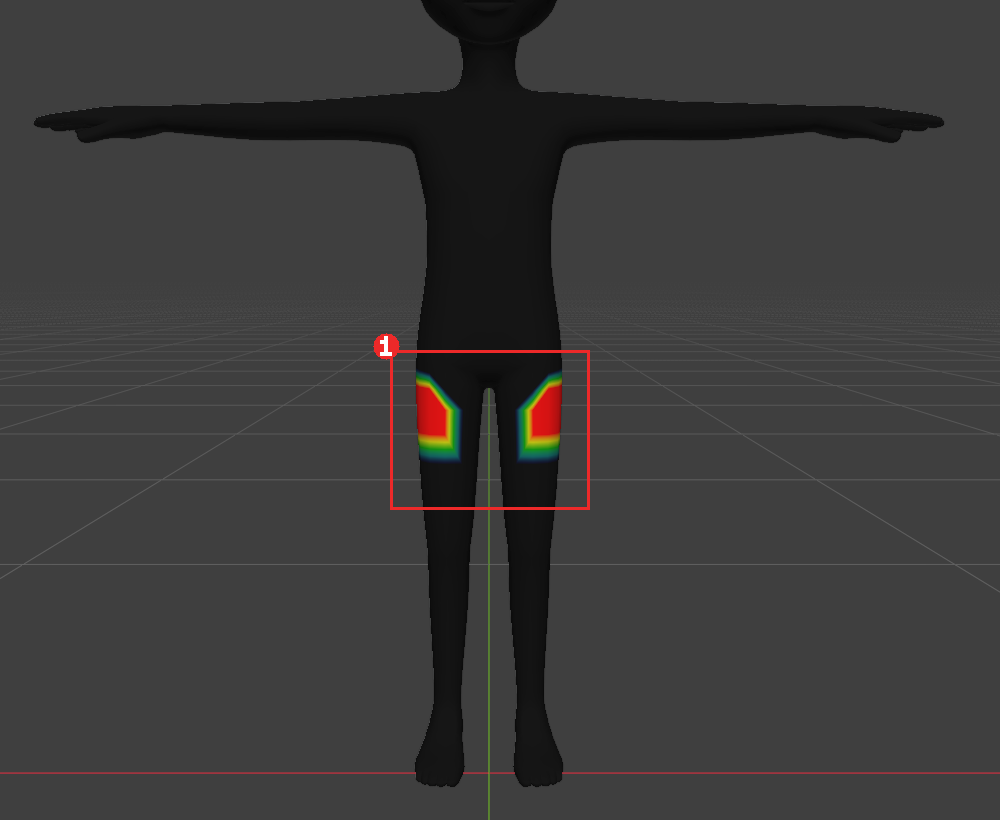
- Pose / Body Clip Test ① — puts the dressed character through ZEPETO's 10 preview poses (including leg lifts and kicks) on the DEFAULT and ANIME body types and the DEFAULT and 1–4 deformations. Quick tests only the default body type with the large deformations 3 and 4
- The result ② names the worst poses. Items with holes in large body types have been rejected
- To see where: select the body (
mask), switch to Weight Paint and pick theBZ_Clipgroup — the skin that comes through is red ①
Mascot head expressions -- a head bigger than the face and away from it (special mask, costume head)
Transfer Face Expressions (below) is for items that hug the face (within 4 cm); a mascot head is out of its reach, and its eyes and mouth are neither where nor as big as the face's.
- Select the head, Tab into Edit Mode, select its eye vertices, Mark Eyes (both eyes at once is fine: left and right are split for you). The same for Mark Brows and Mark Mouth; Unmark ... takes vertices back out
- Transfer to Mascot Head matches each part to the same part of the face by centre and size, and bakes the face's movement scaled to the part: an eye 1.3x the face's blinks 1.3x as far
- The edges of the parts blend into the head, the rest of it stays still. Check with ◀ Rest ▶ or Play Expressions
- The face shape sliders (face length, eye size ...) are left out, so the mascot keeps its shape whatever the user's face settings (Face Shape Sliders Too puts them in)
The marks are mesh attributes, not bone weights: the Send checks and the FBX leave them out. For an eye to close, the head needs a lid to close with (skin above the eye).
Face expressions (headwear, accessory mask, special mask)
- Add Face Expressions to Base ③ — creates the 249 expressions (official names and order) on the loaded base. Only the movement of each expression is applied to your ZEPETO base; a different base is skipped with a message
- Transfer Face Expressions ④ — select the face items first: each part follows the face under it (full within 1 cm, fading out by 4 cm). Expressions that would not move the item are left out
- ◀ Rest ▶ ⑤ — shows one expression at a time on the face and the items
- Expression Clip Test ⑥ — every expression and the guide's pairs (jawOpen + mouthClose,
jawOpen + cheekPuff, brows with blinks) on the ZEPETO base face, checked two ways: face skin coming
through the item, and the item following the face. An expression that moves the face while the
item stays put is reported as "stay behind", and those parts go into the item's
BZ_Followgroup (red in Weight Paint) -- run Transfer Face Expressions again - Play Expressions -- puts every expression on the timeline, on the base face and the face items (10
frames each, a marker naming it): press Play (Space) and watch the item follow the face. Expression
Clip Test builds the same animation after testing, marks the expressions that failed (
! jawOpen: 124
  through, 119 behind
) and jumps to the first one. X next to it removes the keys and markers and restores the frame range
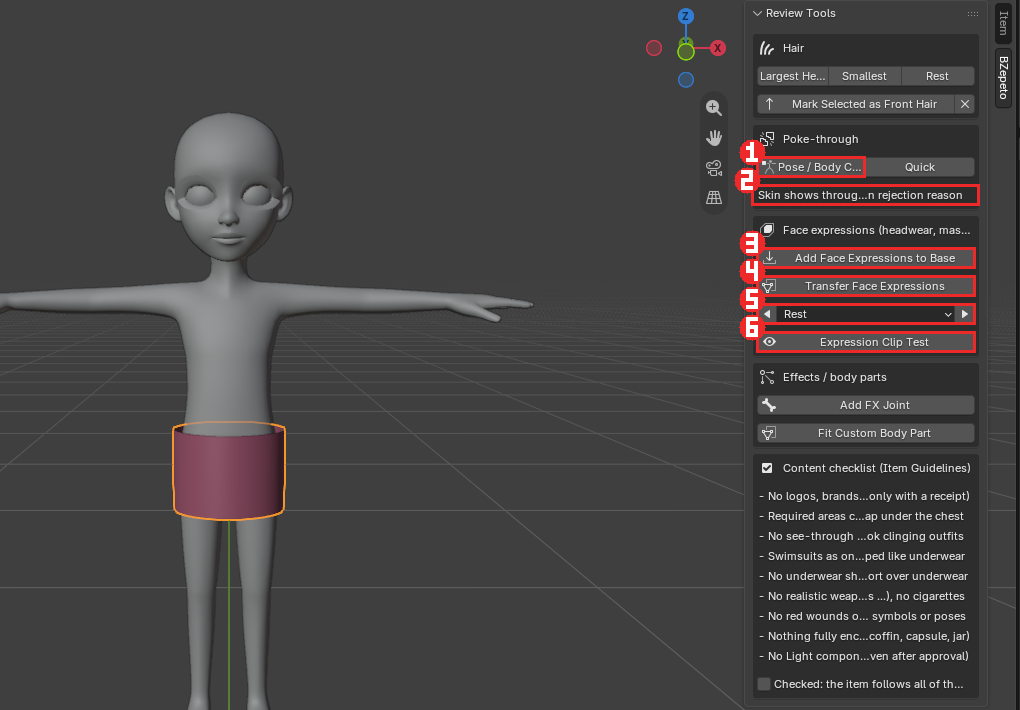
The same panel has the hair Head Size Test (the smallest / largest head the app uses), Mark Selected as Front Hair, Add FX Joint for effects, Fit Custom Body Part and the content checklist (tick it once you have gone through ZEPETO's content rules).
8. Painting in ArmorPaint
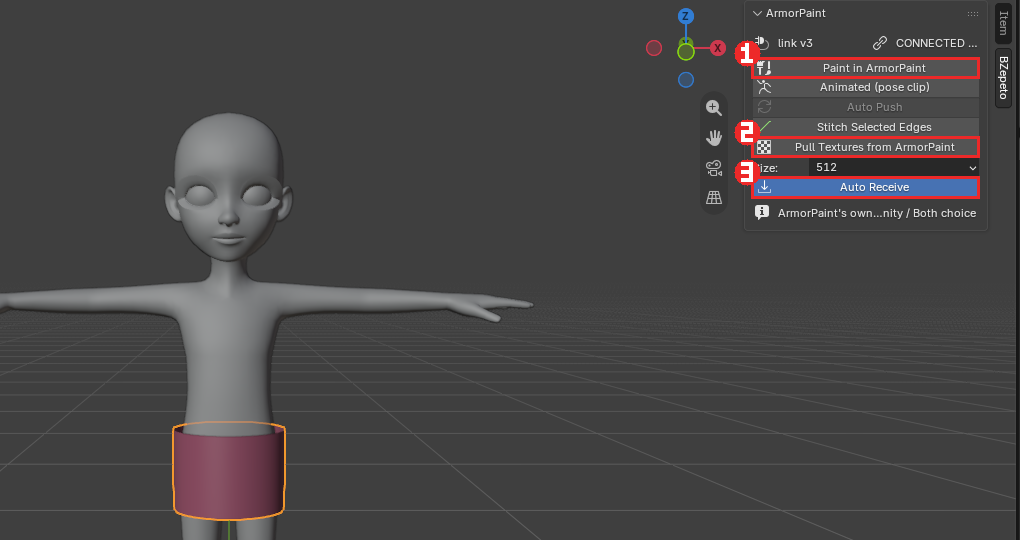
- Select the item and press Paint in ArmorPaint ① — ArmorPaint opens with the item
- Painted textures come back by themselves while Auto Receive ③ is on; Pull Textures from ArmorPaint ② fetches them by hand
- Stitch Selected Edges draws stitches on the selected seam edges (Edit Mode) as their own ArmorPaint layer; Animated (pose clip) sends the item with its armature and action so you can paint in a stretched pose
More on the ArmorPaint side: ArmorPaint.
Set outfits — separate maps for the top and the bottom (UDIM)
When a top and a bottom are one item (a dress, a set outfit), each material can have its own textures (ZEPETO's Dress category allows 2 textures, 1 MB in total).
- Make two materials — e.g.
DR_227_TOPandDR_227_BTM - In the UV editor put the top's UVs in the 0–1 square (1001) and the bottom's in the square to its right (1002, U 1–2). Two materials without moving any UVs also works — they become 1001, 1002 in material order
- Paint in ArmorPaint — ArmorPaint opens
item.1001anditem.1002as UDIM tiles; paint each - The maps that come back (
item_base.1001.png,item_base.1002.png...) go to their own material only - Send to Unity — the UVs are moved into 0–1 inside the FBX only (your Blender scene is left as it is) and Unity hooks every material up to its own maps
Your Blender materials are created in ArmorPaint by name and colour, each already filled on its own tile (one layer per material in Layers). A material an FBX import left black comes across as neutral grey, so it is easy to paint over.
The Send UV check reads "one texture set per material (DR_227_TOP 1001, DR_227_BTM 1002)" when the split is right, and warns when one material spreads over two tiles.
9. ZEPETO Playground
ZEPETO Studio's play-mode menu rebuilt in Blender: 10 animations, camera, body types, the 13 SDK deformations and the space — so you can check the item before it reaches Unity.
The playground needs a capture from your own ZEPETO Studio project once: in Unity, enter Play mode in the playground scene and choose BZepeto > Capture Playground For Blender.